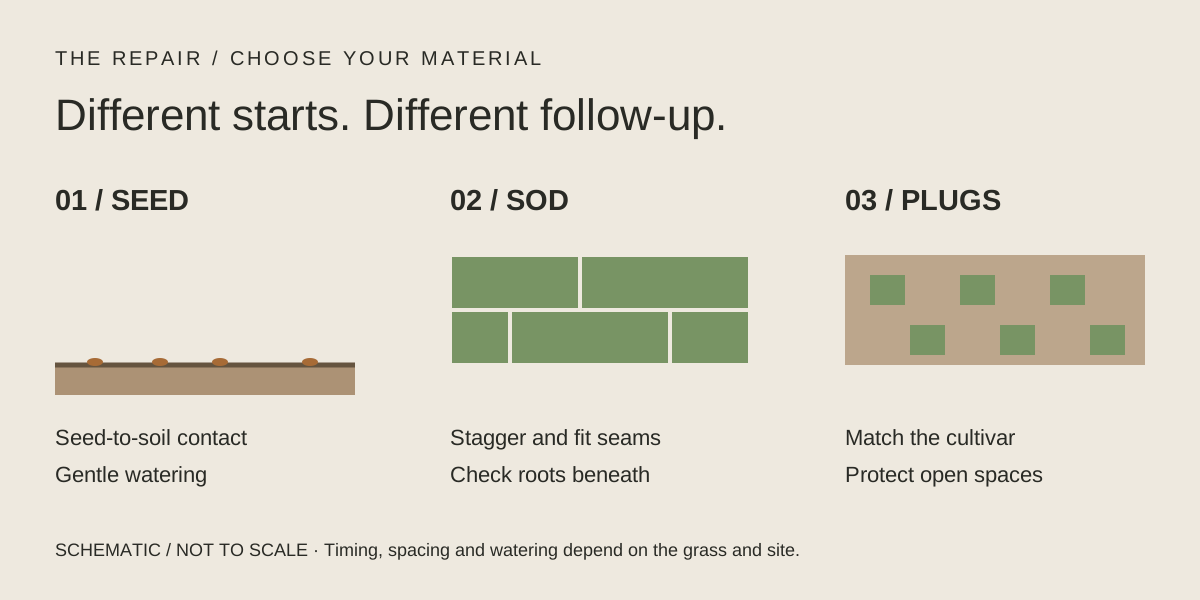
Repair works best when the new grass has a better chance than the old grass did. A bare corner by a gate, a shaded patch and a recently disturbed utility trench need different preparation. Start with the smallest repair that will answer your question.
Diagnose the place before choosing the product
Mark the patch boundary and note its relation to gates, trees, downspouts, pavement and sprinklers. Compare it with nearby healthy turf. A repair is more likely to be useful when you can explain what will change: less traffic, corrected coverage, a suitable grass or a better-prepared seedbed. Persistent deep shade or a busy shortcut may call for a different surface.
Choose seed, sod or plugs deliberately
Identify the existing species and cultivar where possible. Some grasses are available as seed; some matching cultivars require vegetative material. St. Augustinegrass repairs commonly use sod or plugs. Sod gives immediate surface cover but still needs rooting and establishment care. Plugs leave open spaces while they spread, so protect them and use realistic expectations.
Read the seed label beyond the front of the bag
Check species, named cultivars, purity, germination, test date, weed seed and other listed ingredients. A bag’s total weight can include coating or inert material; it is not necessarily all viable seed. Use local grass recommendations to choose suitability first. Then compare the label and the rate for the actual lawn area rather than buying by bag size alone.
Make establishment possible before planting
Confirm the suitable growing window and any reseeding restrictions from previous herbicide use. Prepare for seed-to-soil contact or properly fitted sod, as appropriate. Arrange watering and traffic protection before work begins. Record the planted area and material, then check rooting, washouts and repeated damage as the repair develops.
Repair bare patches in the lawn: a working sequence
Photograph the patch before disturbing it. Record grass type, shade, wear and sprinkler coverage. If the cause is uncertain, work through the diagnosis checklist before removing turf.
- Choose the window and material. Match the existing grass and local season. Read restrictions on any herbicide used there before planting.
- Prepare the contact surface. Remove debris and address the cause of failure. Get soil-test advice for amendments; do not bury exposed tree roots to level a patch.
- Measure only the repair. Use the area calculator and the product’s rate for this job.
- Install and protect. Use the checklist below for your chosen material. Arrange watering and a route around the patch before planting.
Three different establishment jobs
| Material | At installation | During establishment |
|---|---|---|
| Seed | Distribute at the appropriate rate; rake lightly and ensure contact with soil. | Keep the seedbed moist with gentle watering, adjusted for rain. Reduce frequency as roots develop. |
| Sod | Lay fresh pieces promptly on prepared, slightly moist soil; stagger and fit seams. | Check moisture beneath the sod and protect it from traffic. Rooting matters more than its instant green appearance. |
| St. Augustine plugs | Match the cultivar; fit plugs firmly into prepared holes at supplier-recommended spacing. | Keep roots from drying while avoiding saturation. Protect the gaps as the grass spreads. |
Sources: Minnesota Extension on seed and sod (its planting dates apply to Minnesota); UF/IFAS on St. Augustine plugs. For a matching Florida St. Augustine repair, use the regional care plan and new-sod checklist.
Choose the repair that fits the grass
This is a decision worksheet, not a ranking of products. First confirm what grass belongs in the patch and why the earlier turf failed.
Download the printable worksheet One page · PDF · print or fill in a compatible PDF app
| Option | Check before buying | Plan after installation |
|---|---|---|
| Seed | Suitable species and cultivar, label details, local timing and prior herbicide restrictions. | Keep the seedbed suitably moist, prevent washout and protect emerging plants. |
| Sod | Grass identity, source, measured area, delivery timing and prepared soil. | Check rooting and moisture; do not treat surface cover as proof of establishment. |
| Plugs | Matching grass, spacing guidance, area and time available for spreading. | Protect the openings and plugs from traffic while the area fills. |
| A path or planting bed | Whether repeated wear, shade or water conditions make turf impractical. | Choose a surface or planting suited to that use and location. |
- Measure the patch
Split an irregular patch into simple shapes. Add the areas and exclude existing beds or pavement.
- Read the rate for this job
New-lawn and overseeding rates can differ. Match the label and local recommendation to the intended repair.
- Plan the follow-up
Write down who will check moisture and keep traffic off while roots establish.
Example of seed-label arithmetic: a hypothetical 10-pound, single-species bag with 95% pure seed and 85% germination contains 10 × 0.95 × 0.85 = 8.075 pounds of pure live seed. For mixtures, calculate each component separately. This helps interpret weight; it does not prove cultivar suitability or replace the stated seeding rate.
Your field record
Copy these headings into a notebook or a note on your phone, then keep the before-and-after observations together.
- Grass and cultivar
- Measured repair area
- Cause to correct
- Material and label details
- Planting date, watering and protection plan
Keep evidence of your repair
This is a blank observation method, not a completed case study. Photograph the same marked patch from the same position before work and at later checks. Keep dates and weather with each photo; do not change several treatments at once if you want to understand what helped.
| Record | Your observation |
|---|---|
| Before work | Date; grass/cultivar; patch area; likely cause; photo filename. |
| Installation | Material and quantity; receipt cost; preparation; irrigation plan. |
| Follow-up | Date; rainfall; watering; rooting or germination; remaining bare area; photo filename. |
| Outcome | What improved, what failed, what changed, and what remains uncertain. |
Measure the same marked area each time. A greener photo alone does not establish why a repair worked. Open the printable observation sheet. Nothing is submitted to this website.
Common questions
Will any grass seed fill a St. Augustinegrass patch?
A different seed mixture may grow, but it introduces a different grass. Use a matching sod or plug repair when keeping St. Augustinegrass is the goal.
Is a heavier seed bag automatically better value?
No. Check the species, cultivar, purity, germination and other material on the label. Compare suitable products by the amount and quality of seed needed for the job, not total weight alone.
Check establishment before calling the repair finished
Compare progress with the germination range on the seed package or the rooting instructions from the sod supplier. Keep the receipt and label with your repair record. There is no single number of days that proves every repair has succeeded.
- Seed: look for emergence and developing coverage; do not judge only the first seedlings.
- Sod: check root attachment and moisture beneath the pieces; an instantly green surface is not proof of rooting.
- Persistent gaps: compare the moisture, shade and wear record before adding more of the same material.
Minnesota Extension’s establishment guidance distinguishes seedbed moisture from the deeper, less frequent watering used as roots develop. Its season and seed choices apply to Minnesota.
Need an even distribution tool for a larger seeded area? Compare the two spreader models and their limits. For a small spot, use tools you already own.
Read purity and germination before comparing seed bags
Penn State’s lawn-establishment reference separates a component’s percentage of pure seed from its germination percentage. Pure live seed combines the two. Keep the species, cultivar, lot and test date with the bag label; the calculation does not establish whether the grass fits the site.

A coating claim is separate from the seed calculation
Coatings use different technologies. UMass Extension’s September 2026 review found no consistent establishment advantage for the pelleted, fertilizer and water-absorbing coatings commonly sold with consumer cool-season seed. It distinguishes specialized surfactant coatings, whose research results differ; this is not a conclusion that every coating is ineffective. UMass Extension: Coated turfgrass seed Q&A, September 9, 2026.
Ask what benefit the particular coating claims for your planting conditions. Keep preparation, compatible material and follow-up watering in the purchase plan. The pure-live-seed calculation below measures labeled seed weight; it does not test a coating or forecast outdoor establishment.
Original example: one seed component
For a 10 lb bag with 90% pure seed and 80% germination, with no separate hard or dormant allowance, the label-based estimate is 10 × 0.90 × 0.80 = 7.2 lb pure live seed. It is not a forecast of 7.2 lb of plants surviving outdoors and does not choose how much to sow.
If the label reports hard or dormant seed, check the total-germination basis in the calculator before estimating PLS; do not double-count values already included in a total. For a mixture, use each component’s own figures. Do not apply one species’ germination percentage to the entire bag or interpret a higher number as proof of shade or climate suitability. If the percentages exclude coating or additives, clarify their weight basis with the supplier.
Calculate one component’s pure live seed. Method: Penn State Extension: lawn establishment and seed quality. Use your local species guidance and the current product instructions for the actual repair.
The seed emerged. What changed next?
Failure after emergence is a different question from slow germination. Compare the last healthy photograph with the first loss, then check moisture and mowing history before adding more seed or fertilizer.
| What changed | Check before responding | Useful next step |
|---|---|---|
| Seedlings collapse or coverage declines | Did the surface dry rapidly, pond, or remain persistently wet? Is the loss expanding? | Keep the moisture and application history. Ask a diagnostic service about expanding or unexplained loss. |
| The quick component is green, but a mixed repair remains sparse | Has the slower grass established too? A ryegrass component may emerge before Kentucky bluegrass. | Maintain suitable moisture support for the slower component; avoid ponding. Do not end establishment care solely because the first shoots are tall. |
| Ruts or pulled seedlings appear after mowing | Was the soil firm enough for the mower, and was the blade sharp? | Review that pass and protect the repair before another purchase. Height alone does not prove the ground can support equipment. |
Maryland Extension: Seedling problems in lawns, updated March 2, 2023 supports the moisture, mixed-species and mowing checks in its cool-season lawn context. Penn State: Damping-off diseases, updated February 26, 2024 explains that seedling disease can act before or after emergence. Wetness or collapse alone does not identify damping-off; this table does not prescribe a pesticide or a national planting date.
Use the existing repair record to connect the change to a dated observation. For uncertain symptoms, check what a clinic result can establish.
A mixed “all-purpose” seed can leave a patch with a different texture, color or seasonal behavior.